As we wind down the last couple of weeks of 2011, I wanted to express my appreciation for all of the support we have received this year. It has been a very busy year. Hundreds of Triangle residents and building owners trusted us to repair or replace their roofs and gutters. We have exceeded nearly all of our expectations in 2011.
With that being said, what I feel is more important is whether we exceeded your expectations. I never want to lose sight of that goal. I believe it is fundamental to our existence.
We at Allen and Deans want to thank all of you who have either considered us or actually contracted us. We do not take that consideration or trust lightly.
Wishing all of Raleigh only the best this Holiday season.
Sunday, December 18, 2011
Thursday, November 24, 2011
Thanksgiving Blessings 2011
We hope everyone is enjoying Thanksgiving with their families and friends. We at Allen and Deans are very thankful, as 2011 has been a very good year.
But much more importantly, I would also like to express my thanks, appreciation and gratitude for the men and women in our Armed Forces, past and present, who will not have the opportunity to share this Thanksgiving with their families and friends. Because of their sacrifices, I have the opportunity to do what I do and live in the best country on the planet, in FREEDOM.
May God Bless and protect you all.
Saturday, November 5, 2011
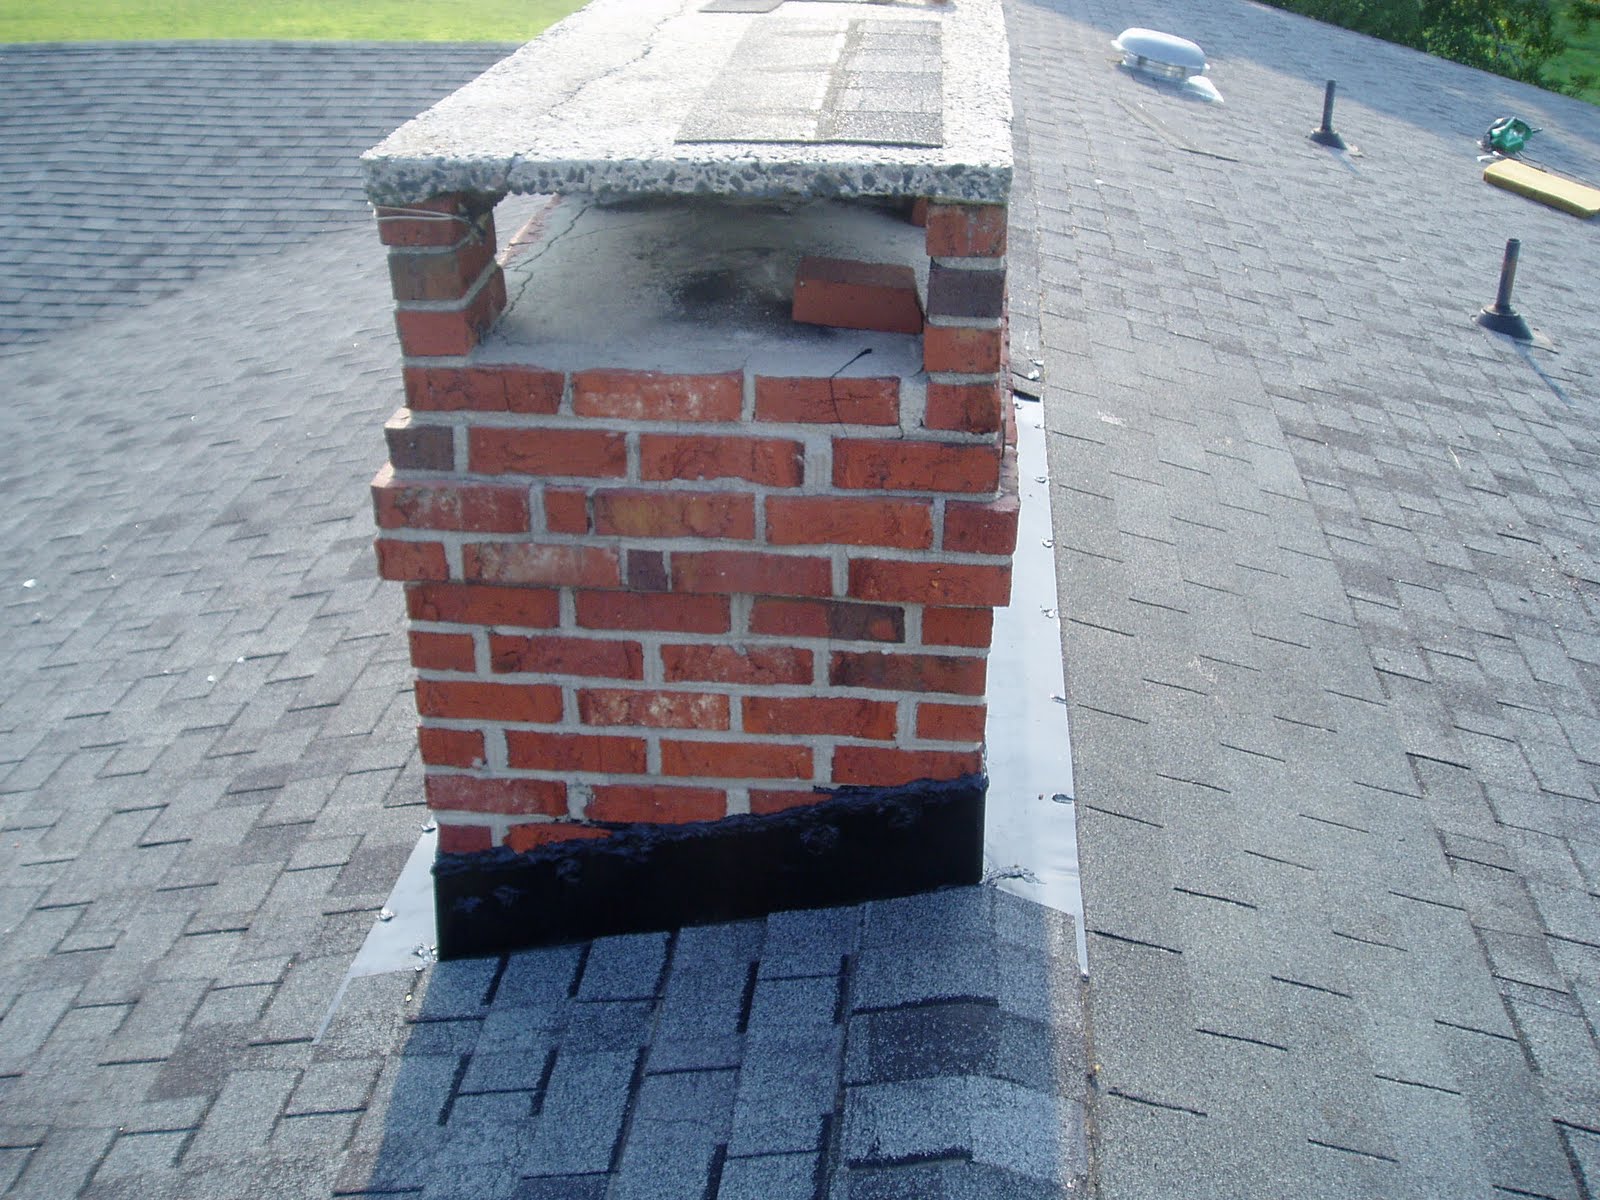
Chimney Cricket not Jiminy Cricket Installation
There are time when we receive calls at Allen and Deans about leaking chimneys. In most instances the metal flashing has rusted or corroded allowing water to enter. However, there are times when the chimney is positioned at the eave (bottom of the roof) and there is no cricket. Rain water flowing down the roof hits the back of the chimney. Over a long period of time, water will begin to infiltrate or penetrate in or around the metal flashing, which is the last line of defense for the chimney. This is usually the case in older homes here in Raleigh.

Add some pine straw or leaves behind the chimney and you can easily see how water and moisture can stay behind the chimney and not flow away to the sides and off the roof.
A cricket is nothing more than a wooden structure consisting of 2"x4" lumber for the base structure and 7/16" OSB for the angled platform.

 Now when it rains, the water is safely directed to either the right side or the left of the chimney falling harmlessly into the gutters below.
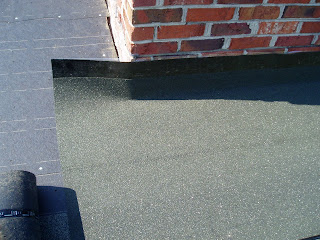
Here is a photo of a brick chimney we worked on recently. Note how wide the chimney is. It almost serves as a dam for water as the water runs directly into the back wall.

Add some pine straw or leaves behind the chimney and you can easily see how water and moisture can stay behind the chimney and not flow away to the sides and off the roof.
A cricket is nothing more than a wooden structure consisting of 2"x4" lumber for the base structure and 7/16" OSB for the angled platform.
The last photo is the cricket completed with "ice and water shield", new metal step and counter flashing and new, 3-tab, self-sealing shingles.
Roof Damage from Storm
From time to time, we encounter roof repairs in Raleigh from storms. In this case, we were asked to repair a pavillion or shelter roof damaged from the tornado earlier this year. Here you can see what we were faced with. As you can see there was damage to the decking (sheathing), fascia board on both the eaves and rakes, trim, drip edge and the shingles.


Here is a picture of the roof repair upon completion. It features a GAF Royal Sovereign, Autumn Brown shingle.

Sunday, October 30, 2011
Bradford Creek Golf Course
We recently had the opportunity to work with The Parks and Recreation Department of The City of Greenville.. The clubhouse roof at Bradford Creek Golf Course was severely damaged as a result of Hurricane Irene, earlier this summer.
The project featured a CertainTeed LandMark 30 architectural shingle.
Here is a photo prior to the start of the project.

Here are some photos after the roof was installed.


The project featured a CertainTeed LandMark 30 architectural shingle.
Here is a photo prior to the start of the project.

Here are some photos after the roof was installed.


Wednesday, October 5, 2011
Roof Deck (Sheathing) Overlays
Due to the tornado we experienced in Raleigh earlier this year, Allen and Deans has had the opportunity to repair or replace many older roofs. In several cases, the roofs on these homes were over 40 years old.
When inspecting and measuring these roofs I could not help but notice numerous "soft" spots, especially between the rafters. In some extreme instances, you could hear the plywood sheathing starting to crack from the weight of my step.
Upon further inspection we discovered the following:
1) The plywood sheathing was only 3/8" thick instead of 1/2"
2) The rafters were 24" OC instead of 16" OC
3) There was no roof-top ventilation only gable-end vents
It has been demonstrated due to excessive heat build-up in the attic, combined with thin plywood sheathing and 24" OC rafters and time, plywood begins to show signs of stress and fatigue.
We discussed options with our client. It was decided to install a 7/16" OSB (Orient Strand Board) directly over the existing sheathing.


By directly nailing over the existing sheathing, there was no cost for labor to remove the original sheathing, nor was there any additional dump or landfill fees.
The roof structure is very secure and solid. It is now ready to accept new shingles in order to successfully complete the roof project.
Saturday, August 27, 2011
(Almost) Free Roof Ventilation
Over the last 36 months, we have received a number of requests for roof ventilation. But these requests are not inquiring about ridge vent or even electric (power) roof ventilators. Clients now are inquiring about solar powered roof ventilators.
Earlier this week we had the opportunity to install a new Green Machine(tm)Solar Powered Vent by Master Flow for one of our clients.
We started by finding the center of the roof. We then removed the shingles and felt in the designated area. We took the plunge by cutting in the roof according to the unit's size as you can see below.

We then set the unit in place and proceeded to flash around the unit's base with new "ice and water shield" and new shingles. Upon completion, the installation looks like this.

So far clients have reported a noticeable reduction in their energy consumption costs as a result of the installation. Also, unlike an electric power ventilator, which will run for hours on end, using electricity in the process, this unit is passive.
Monday, July 18, 2011
Chimney Flashing Repair
We recently received a request to repair a leaking chimney. We could have simply caulked the perimeter of the counter flashing and "called it a day". However, it has been my experience that caulking a chimney does not provide a long term solution. In many cases, it does not provide ANY solution at all.
We took a much different approach to solving the flashing leak. We removed all the shingles, felt and metal flashing. Upon cleaning the perimeter very thoroughly,
we installed a weather barrier or generically referred to as "ice and water shield" around the perimeter as you can see below.

You can see how we installed the "ice and water" on the wall and then folded it so it laid flat on the roof deck on all 4 sides of the chimney.
We then installed new step flashing, which is covered up by the new, black counter (outside) flashing.


Once the counter flashing has been caulked, we then finished the repair by installing shingles along all 4 sides of the chimney.
This flashing process will provide problem and leak free service for many years to come.
But wait a minute. Something doesn't look right here. Can you tell what is wrong in the last couple of photos? Look carefully. Do you see it?
You are right. It is the shingles. They don't match, do they? The shingles on the back slope are regular 3-tab shingles. The front shingles are a CertainTeed Horizon shingle, which unfortunately were discontinued a couple of years ago. In order to make the front slope of the roof (look) presentable, we kept and in some instances "reused" the Horizon shingles from the back roof slope whenever possible. We simply installed the new shingles on the back slope where they would not be as noticeable or visible.
We took a much different approach to solving the flashing leak. We removed all the shingles, felt and metal flashing. Upon cleaning the perimeter very thoroughly,
we installed a weather barrier or generically referred to as "ice and water shield" around the perimeter as you can see below.


You can see how we installed the "ice and water" on the wall and then folded it so it laid flat on the roof deck on all 4 sides of the chimney.
We then installed new step flashing, which is covered up by the new, black counter (outside) flashing.


Once the counter flashing has been caulked, we then finished the repair by installing shingles along all 4 sides of the chimney.
This flashing process will provide problem and leak free service for many years to come.
But wait a minute. Something doesn't look right here. Can you tell what is wrong in the last couple of photos? Look carefully. Do you see it?
You are right. It is the shingles. They don't match, do they? The shingles on the back slope are regular 3-tab shingles. The front shingles are a CertainTeed Horizon shingle, which unfortunately were discontinued a couple of years ago. In order to make the front slope of the roof (look) presentable, we kept and in some instances "reused" the Horizon shingles from the back roof slope whenever possible. We simply installed the new shingles on the back slope where they would not be as noticeable or visible.
Wednesday, July 6, 2011
Watch Out for dem Squirrels
Over the last several weeks of looking at both roofs and gutters I must admit I have seen some unusual stuff. There's no rhyme or reason. It just happens.
In the past, I have seen instances of squirrel infestation, including my own home. Usually these uninvited "house guests" take residency in one's attic. Since they usually don't have a key, they, like water, take the path of least resistance by finding an opening large enough to squeeze their bodies into the attic. Or they can eat their way into an attic. Wood fascia, trim, vinyl gutters or gutter guards are simply appetizers for these ambitious critters.
However, the photo below is a first for me.

This is an aluminum end cap of a gutter system. There is a small portion missing from it. We did not alter, other than removing it from the gutter nor did we cut this end cap ourselves. This the first time in 12 years that I've seen anything like this. I can only assume this particular critter was very determined to take up residency at any
Sunday, June 19, 2011
Clogged Gutter or Contemporarily Horizontal Flower Bed...You Decide
In my recent travels, I ran across this on a building.
Over the years, I've seen hundreds, if not thousands of clogged gutters. But this, as you can see is somewhat different. At first, I felt the gutter should be cleaned immediately. However, after a moment of thought, it clearly shows an added aesthetic beauty to the building.
What say you?

Over the years, I've seen hundreds, if not thousands of clogged gutters. But this, as you can see is somewhat different. At first, I felt the gutter should be cleaned immediately. However, after a moment of thought, it clearly shows an added aesthetic beauty to the building.
What say you?
Sunday, May 29, 2011
Roof Problems: Short Laid Shingles= Rotting Fascia
One of the most frequent roof related problems we see here in the Raleigh market is rotting fascia board and soffit. If the home has gutters, how can that still allow fascia and soffit rot, you may ask? Lets see if we can sort this out.
One possibility is the gutter is filled with trash. This could prevent rain water to move or flow from the gutter to the downspout properly and efficiently. Water will over-flow the gutter, falling from both the front and the back of the gutter. The simple solution is to monitor the gutters for trash on a regular basis.
However, our problem is not related to trash. It is related to a roofing or shingle problem. Specifically, it is related the length of the roof shingles. We have found that many fascia and soffit problems are due to shingles being improperly installed at the eave. Simply put, the shingles are "short-laid", meaning they do not extend past the fascia board far enough to allow the rain water to fall harmlessly into the gutter below. In some instances, the shingles extend only 1/2" past the fascia board.
Unfortunately, this photo demonstrates about 3/8" overhang. Since rain water subscribes to surface tension, the water does not fall directly off the edge of the shingle. It falls behind the back wall of the gutter or even into the soffit and begins the rotting process, as you can see below.

What is the solution? We can remove and replace the entire slope of the roof. That would be a profitable solution for the contractor, it is not economically feasible for the homeowner. The solution is to install a "custom" aluminum drip edge.


The two photos to the left show the drip edge prior to installation and fastening to the fascia board. Once properly installed, the rain water falling off the shingles has no choice but to drop harmlessly into the gutter below efficiently solving the problem.
The cost of installing the "custom" drip edge is miniscule by comparison to replacing a roof slope. Also, it is virtually unseen from the ground.
The keys here are to have your gutters maintained as well as inspect the performance of the gutters during a shower to determine if there is a problem. You can potentially save hundreds of dollars in fascia and soffit replacement costs by acting proactively.
One possibility is the gutter is filled with trash. This could prevent rain water to move or flow from the gutter to the downspout properly and efficiently. Water will over-flow the gutter, falling from both the front and the back of the gutter. The simple solution is to monitor the gutters for trash on a regular basis.
However, our problem is not related to trash. It is related to a roofing or shingle problem. Specifically, it is related the length of the roof shingles. We have found that many fascia and soffit problems are due to shingles being improperly installed at the eave. Simply put, the shingles are "short-laid", meaning they do not extend past the fascia board far enough to allow the rain water to fall harmlessly into the gutter below. In some instances, the shingles extend only 1/2" past the fascia board.

Unfortunately, this photo demonstrates about 3/8" overhang. Since rain water subscribes to surface tension, the water does not fall directly off the edge of the shingle. It falls behind the back wall of the gutter or even into the soffit and begins the rotting process, as you can see below.

What is the solution? We can remove and replace the entire slope of the roof. That would be a profitable solution for the contractor, it is not economically feasible for the homeowner. The solution is to install a "custom" aluminum drip edge.


The two photos to the left show the drip edge prior to installation and fastening to the fascia board. Once properly installed, the rain water falling off the shingles has no choice but to drop harmlessly into the gutter below efficiently solving the problem.
The cost of installing the "custom" drip edge is miniscule by comparison to replacing a roof slope. Also, it is virtually unseen from the ground.
The keys here are to have your gutters maintained as well as inspect the performance of the gutters during a shower to determine if there is a problem. You can potentially save hundreds of dollars in fascia and soffit replacement costs by acting proactively.
Saturday, May 21, 2011
Gutter, Fascia and Siding Damage
Yesterday we completed a job which included some fascia board and siding rot. The repair, as you will see, is not very big. 
However, we see this type of damage all too often. The problem was the wall was not flashed properly. Water, running down the roof slope was directed INTO the siding, instead of directed away from the siding.
Upon removing the rotted hardboard siding and fascia we "reworked" the step flashing, directing the water into the gutter and solved the problem. A little paint and a new 5" seamless aluminum gutter and the job is completed.

Wednesday, May 4, 2011
Tornado Aftermath
It has been nearly 2 1/2 weeks since a series of tornadoes ripped through Raleigh as well as several other areas of North Carolina. In that time I have seen dozens of homes damaged or destroyed as a result. My heart goes out to those homeowners and tenants who have suffered from the storm.
Our goal at Allen and Deans in the aftermath of the storm is to provide continued, professional roofing and gutter repair and replacement services to those in need. We are making every effort to meet the timely service demands the storm has presented.
Upon receiving your call or email for a free estimate:
* we will set a convenient time to meet with you
* discuss your project with you in detail
* provide an estimate immediately, if possible
* if needed,"weather-proof" the exterior ASAP in advance of the scheduled service
* schedule your project as quickly as possible
We clearly recognize these are very trying times especially for those who were impacted by the storm. We will make your experience with Allen and Deans as positive as possible.
We thank you for your support and understanding.
Sunday, April 17, 2011
The Tornado in Raleigh, NC
Yesterday, we were hit with a Tornado here in Raleigh. It was clearly the worst natural disaster in the Triangle area since Hurricane Fran.
Although the homes in our neighborhood were sparred any damage, we stll, like many areas in Raleigh do not have electricity.
However, many homes just 6-7 blocks away in the Neuse Crossing and McKinley Hill subdivsions, were severely damaged or destroyed.
The staff at Allen and Deans, Inc. wish to extend our sincerest sympathies to all who were adversely impacted by the tornado. Our thoughts and prayers are with you.
Wednesday, March 30, 2011
Gutter Installations
We recently had the opportunity to install gutters on 2 new houses in a new Garner subdivision. Interestingly, the houses were side-by-side. These types of situations don't occur very often so we are very appreciative when they do present themselves.


Both houses feature 5" seamless aluminum gutters and large, 3"x4" aluminum downspouts.


Both houses feature 5" seamless aluminum gutters and large, 3"x4" aluminum downspouts.
Saturday, March 26, 2011
During and After a Roof Project
Have you ever wondered just how we or any roof contractor manages debris during a tear-off? How can we prevent the old shingles from damaging delicate plants and shrubs below?

On this particular job, we used a 40'x60' tarp as a "shute". The new tarp was nailed at the eave of the roof, while the bottom was pulled forward, away from the plants, shrubs and the house itself. The shingles are literally "passed" down to a man standing at the eave who carefully slides the shingles and felt paper down the "shute".
Here is a photo of the completed roof with a clean, debris-free yard.

Sunday, February 27, 2011
Shingle Blow-Off
This time of the year we start to receive calls about roofs in the Triangle which have shingle blow-off. Here is an example below.

These types of situations don't actually need to happen. In most instances, these blow-offs are as a result of a workmanship issue. Some of the most common reasons are as follows:
1) The shingles are nailed improperly. The nails are placed too high on the shingle. Instead of nailing into 2 shingles with 1 nail, by nailing too high, only 1 shingle is fastened.
2) The shingles do not have enough nails in them. A minimum of 4 nails is required. Shingles on the (rake) edges and/or on very steep roof slopes should have 6 nails per shingle.
3) Many older roofs do not incorporate a "starter" course of shingles along the rakes and eaves. The starter provides more protection against high winds as well as prevents the shingles from sagging.
Repairing this roof problem is relatively easy. The damaged shingles are removed. The felt paper is evaluated. If it is sound, it is re-used. Otherwise, it is removed too. The repair is finished by installing a starter course of shingle(s) and new shingles on the roof deck as well.
We are coming into a season where we will be seeing higher winds. Inspect your roof safely from the ground after we experience those windy days.
Wednesday, February 23, 2011
Short-Screwing a Downspout
We recently were asked to look at downspout which had recently fallen from the house. You can see below what I am referring to. (I hate ending sentences with a preposition.)

Looking closer, we found the gutter contractor used a 1/2" screw to hold the downspout pipe band to the house. There were 3 pipe bands securing the downspout, but unfortunately each one only had a 1/2" screw as you see below.

The best fastener for this application would be a 1 1/2" zip screw. Needless to say it provides a "better bite" into the corner post.
You can check your home's downspouts very easily. Simply hold the downspout and give it a gentle pull. If there is not any movement or wiggle, you know they are secure.
Monday, February 14, 2011
Another Pipe Collar Nightmare
Last week I posted about pipe collars and the problems they can create if they are not replaced on a regular basis.
Today's repair took on a whole new dimension. But not because of the effort of the homeowner.
We were called to provide a quote on leaks in the second floor hallway. Upon further review, here is what we found.

The previous repair of the pipe collar/boot was done by simply installing a new collar directly over the old one, without removing the old cracked collar. In order to keep (or attempt to keep) the second collar on the roof, it had to be nailed aggressively, which ultimately never ended the leak.
We removed both collars and installed 1 new collar, solving the problem.
However, there was another vent pipe to the left of the one we repaired. Out of curiosity we inspected the other. What do you think we found. Another vent pipe with 2 collars on it. Although there were no signs of a leak, we repaired the second as well.
Here is a completed look of the roof repair with the 2 original collars in the foreground.

If you cannot watch the repair being performed, at least ask what was actually done. You can also ask to see the old parts, in this case the collars.
Thursday, February 10, 2011
Pipe Boots: A Small Item Which can Create LARGE Roof Problems
There are several items on any given roof. One of the smallest items are pipe boots or pipe collars. These are the black rubber and PVC units you see on the bottom of those white (vent)pipes protruding from your roof. Their purpose is to prevent water from penetrating through the hole in the roof deck.
As you can see here, this boot is severely cracked. As a result, every time there is rain, the attic below is getting wet. Left unchecked, penetrating rain water will begin to rot the plywood or OSB (Orient Strand Board)decking creating a more serious leak issue.
Generally the pipe boots will start to deteriorate in 7-10 years after they are installed. Certainly their exposure to the sun will increase the deterioration process. The seal on top becomes brittle and begins to crack.
In a sense, pipe boot failure is much like brake failure on your car. Rarely, do the brakes go bad on both wheels simultaneously. The same is true with pipe boots. Not every boot on your roof will fail at the same time. But with some time, all the other boots will begin to fail as well.
However, just like brakes, your mechanic will recommend replacing both or all brakes simultaneously. It is wise to replace all pipe boots at once. By doing so, you will have the satisfaction knowing your roof will be "water-tight" at those vent pipe (boot) penetrations.
If you have a pair of binoculars, why not have a look at the pipe boots on your roof? If you do not see any indication of cracking you can be sure they are doing their job. If there is evidence you should contact you roof contractor to have the boots removed and replaced.
Downspout Problems

We run into this problem quite a bit. It can as much as several times a month. What is this problem? Gutters overflowing. But wait for a moment here. The title says 'Downspout Problems'. What do you mean?
We find all too often that gutters that chronically over-flow are as a result of trash (gutter debris)or no outlets in the gutter. I want to address the latter today.
Too many gutter contractors in the past, (80's, 90's and some even today) do not take the time, effort or expense to install an outlet in the bottom of the gutter. Instead they simply cut an "X" and literally punch a hole in the gutter, using the 4 tabs as an "outlet" IT IS QUICK, EASY AND CHEAP.
In the photo above, you can see an example of an "X" cut in the bottom of gutter. The opening here is for a 2"x3" downspout. You can clearly see how easy it is for trash to collect in the opening allowing water to over-flow the gutter.
If this is the case in your gutters, you do have a solution. They are as follows:
- Clean your gutters more frequently.
- Install gutter protection.
- Install a larger (3"x4") outlet and downspout.
The latter is the most common solution for homeowners. It does allow more water (twice as much) to flow and also will allow more debris to pass as well. However, this doesn't mean you no longer have to monitor and clean your gutters. That unfortunately will still have to be performed.
If you are experiencing this type of problem, have a professional take a look and evaluate the problem(s). Finding the right solution will give you "peace of mind" and well as protect your home.
Subscribe to:
Posts (Atom)
